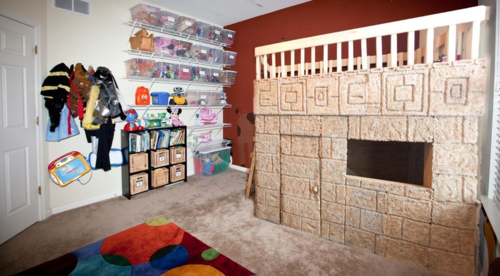
One of the hardest areas of our home to keep organized are the toys. Whether you have an entire room devoted to your children’s toys, a corner in the living room, or a portion of the family room, it seems to be a stressful area for most moms. I decided to tackle this project one winter while living in Pennsylvania.
This was a guest room just outside our family room for a few years and our playroom was located in the basement. After getting tired of taking the toys that would find their way upstairs, I finally moved the playroom to the first floor. Here’s the room before we started turning it into a playroom.
Besides organizing the toys, I thought it would be fun to build a play area for my kids. I started this project and finished it while it was winter time and snowing a lot. I thought it would be fun to build an inside playhouse since the kids get “cabin fever” as they called it back east.
This room has one of the best views of the backyard lake so I didn’t want to block the window. I measured out the space and decided to build a long and narrow playhouse where the top story would look out into our backyard. I wasn’t really sure how to build it without it falling down since I had never created something of this size. I skyped my parents who were on a mission to Africa at the time to try and get some help from my dad. My dad is an amazing builder. He gave me a few pointers as I showed him the beginnings of my playhouse. I ended up having to redo the framing and begin again. My kids were always near by playing throughout the stages.
For the exterior, I thought it would be fun to create a Mayan theme or Zarahemla setting where the kids could play. I patterned the outside of the playhouse after the Rainforest Cafe. It has some pretty awesome Mayan looking artwork. It was a fun and messy job using styrofoam and a knife to create the shapes and fake bricks. I attached the pieces to the plywood and painted it with a stone textured paint.
The most important thing while building the playhouse was to make sure it would hold the weight of my kids. As you can see in the picture, it held all my kids plus myself and it didn’t move a muscle! I added a light inside on the first floor and used some scrap wood flooring for the second story.
This was no small project, but it is always rewarding to see the smiles on my children’s faces as they enjoy one of my new creations. There is nothing better, than taking raw material and creating it into something creative and useful. I was able to build this playhouse with very little money since I reused some of the plywood from a previous project.
Once the playhouse was finished, I pulled together the rest of the room by adding wire shelves, hanging racks for dress up clothes, a white board, animal map and reusing the animals that my sister and I cut out of plywood back when I was 8 months pregnant with my second son. (I get so much done during those last months of being pregnant! Check out my son’s baby room where I used the same animals from this project.)
I attached labels to the bins and baskets for easy clean up and I tried to keep everything off the floor so that there was more room to play. It also makes vacuuming really easy.
I love that most of the toy bins are out of reach of little hands. We had a toy rule that they could take one bin down but to get another one down they had to put the first one back. Sometimes it worked and other times it didn’t work so well. As moms, we do the best we can to stay organized and neat but in the end we sometimes just have to close the door and move on!
I hope this post helped inspire you and perhaps give you some tips and tricks to bringing a little more order to your child’s playroom or play space. We’d love to hear from you about what works and what doesn’t within your own homes. Please post your comments below.
If you enjoyed this article, please feel free to “pin” the image below to your Pinterest Board so you can quickly refer to in the future as you get your home and family life in order.

